Internal chat 💬
Introduction
One of the features of the Message center section is the ability to communicate within the team using Internal chat, which allows team members to quickly and efficiently exchange information, ideas, and solutions. It helps reduce messaging time, increases collaboration and productivity, and avoids the loss of important information. In Internal chat, it is possible to create groups to discuss specific tasks or projects.
Location
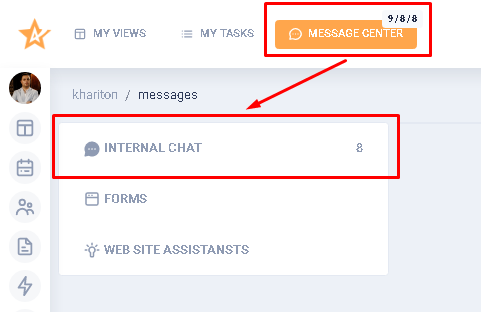
To go to Internal chat, it is necessary to click on the Message center section in the page header. This will open a page that displays a block with a list of communication channels that are available to the user. |
|
This list contains the Internal chat section. Clicking on it will take the user to the form of communication with the team members. |
|

Functionality
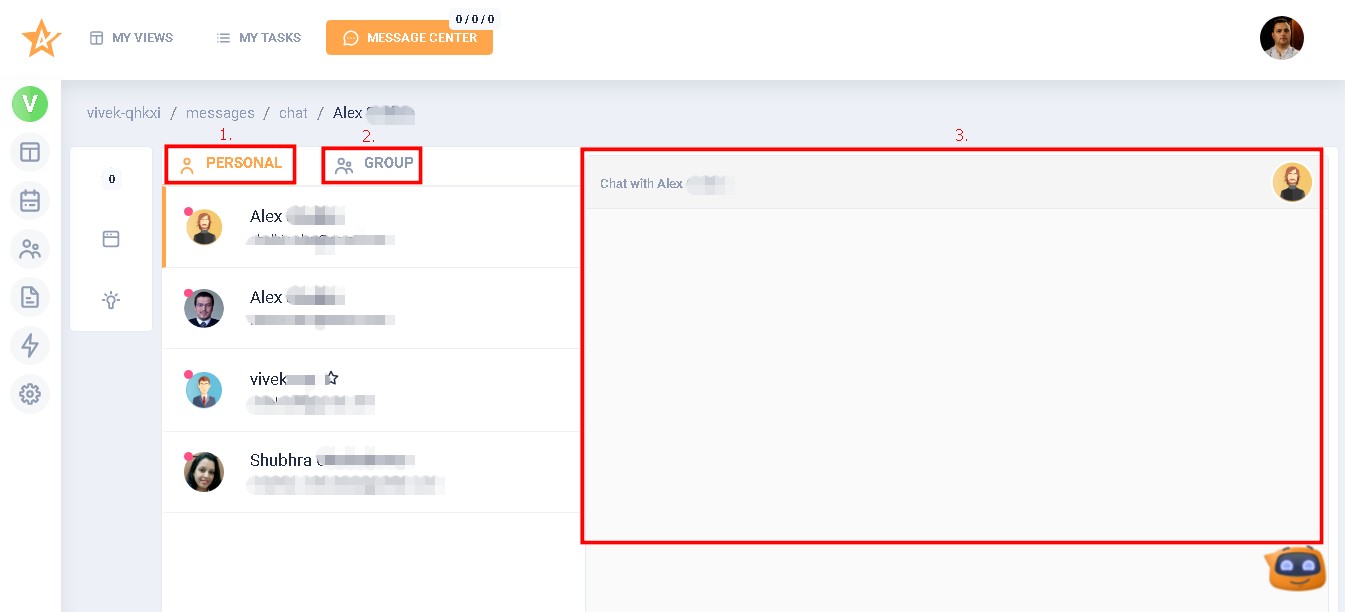
The team member communication form has a Personal tab (1), a Group tab (2), as well as a block with the history of communication (3) between team members and a message entry field. By default, the Personal tab is always active.
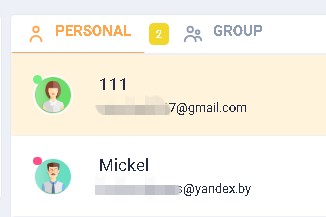
Personal tabIn the list of contacts in the Personal tab, only team members (excluding the user himself) specified in the "Team" list in the "Settings" → "Team settings" section are displayed. It's worth noting that in the list in "Personal" contacts are displayed in the same way as in "Team settings", i.e. with the indication: avatar, team member's name, his working email. If a team member is currently in the system, his avatar displays a green indicator in the upper left corner. If the team member is not in the system, the indicator will be red. |
|
As soon as a new team member is added to the team, his data will also be displayed in the list of the Personal tab. If a team member is deleted, his data will disappear from the list and the history of correspondence with him will not be displayed. It is not possible to delete a contact from the list in any other way. | |
Group tabAny team member can create a group to include all or some of the team members. Any team member can be invited into a group. There is no limit to the number of groups the user can create or be invited to. To create a group, click on the Group tab and then on the Create group button. |
|
Then a pop-up module of group creation will be displayed. |
|
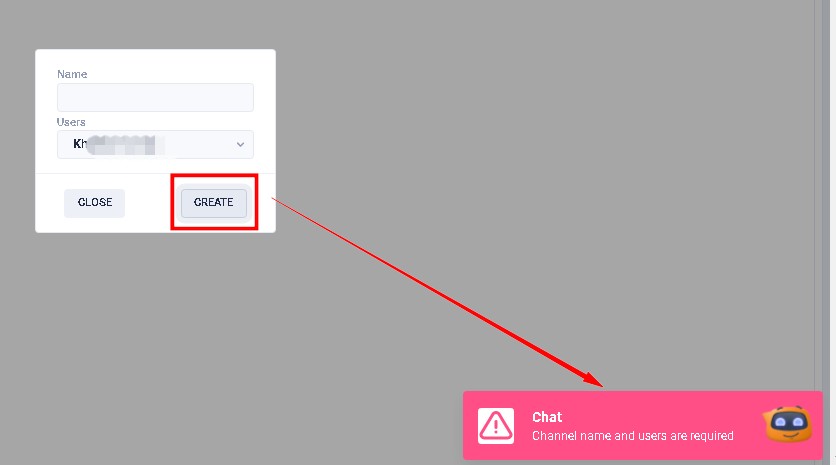
The module has two fields - Name and Users, as well as Close and Create buttons. The Name field is mandatory. There are no restrictions on the number and characteristics of the entered characters. The Users field is mandatory. The current user is selected by default (his checkbox is activated). Clicking on the field will display the list of team members. To select/remove a team member, you must activate/deactivate the checkbox in front of his name. Clicking the Close button closes the group creation form, and the data entered will not be saved. If the Name and Users fields are filled in, when you click on the Create button, the group is created. If the Name or Users field is not filled in, the group is not created and a popup appears notifying you about it. |
|
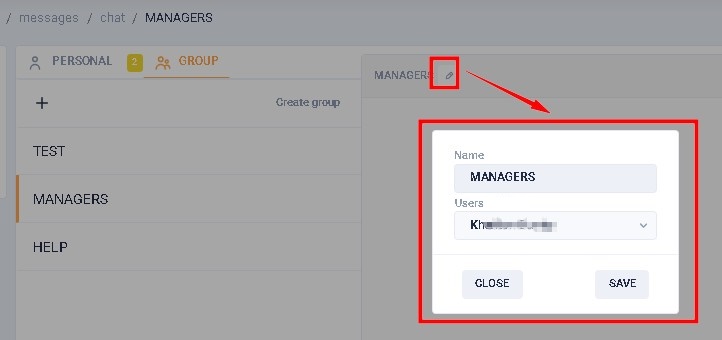
To edit the values in the Name and Users fields, click on the pencil icon in the upper left part of the communication history block. Editing a group is possible for any member of the group. The function of deleting a group is still under development. |
|


Field for communication
When in the Personal tab, it is possible to create a message to an individual team member. When in the Group tab, it is possible to create a message to all members of the group.
To create a message, enter the necessary text in the message box and click on Enter or the plane icon on the right side of the field. The maximum length of the message is 250 characters. The field accepts any characters. |
|
After the message is sent, it is displayed in the communication field. The date and time of its creation, status, as well as the button to edit it are displayed under it. The edit button is hidden by default, it is displayed if you put the cursor over the text of the message. |
|
In order to edit a message, user should click on the corresponding button under it. After that, the text of the message will be displayed in the message input field. Only your own message can be edited. After editing the message, user should click on Enter or the plane icon in the right part of the field. Made corrections will be displayed in the message field at once. It is impossible to delete the message. |


Read and unread messages
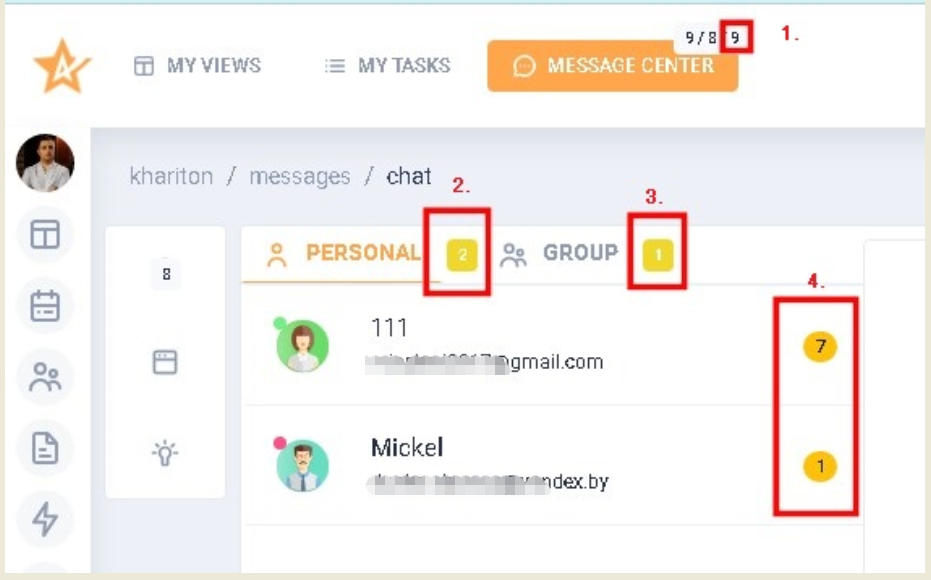
If the user has unread messages, the user will be notified accordingly. |
|
|
|
Messages will only be displayed when the user is in their workspace. As the user views the messages, the indicator values will decrease accordingly. | |

DEV NOTE Add a user to the chat room
DEV NOTE Remove a user from a chat room
DEV NOTE Create a Group
DEV NOTE Edit a group
DEV NOTE What do the indicators mean?
DEV NOTE How to post a message to a chat/group